PTM&W Casting Materials - Tooling FAQs
- How do you properly mix casting resins?
- What causes porosity in castings?
- What is the proper way to deair a casting material?
- What causes a casting to crack?
- What causes soft castings?
- What causes excessive shrinkage?
- What do shrinkage numbers mean on data sheets?
- How can shrinkage be minimized for large castings?
- What types of bulk fillers can be used to control shrinkage?
- How can thermal conductivity be increased?
- Can casting resins be thinned by solvents?
- How can casting resins be thinned?
How do you properly mix casting resins?
Proper mixing of casting resins is critical because soft spots or uncured material in the casting can result in tool failure or require rework. Improper mixing can increase the chance of trapped air in the casting.
When mixing casting resins, always “double-cup”. This simply means to weigh the resin and hardener in one container and thoroughly mix by scraping the sides and bottom of the container. Transfer the mixed material into a second container and remix in the same manner. This procedure eliminates the possibility of applying unmixed material.
Never mix in only one container, as there is a good chance that either the resin or hardener will cling to the sides, bottom or corners of the container and not be properly blended. Also, never scrape the sides of the container when pouring into the mold cavity.
What causes porosity in castings?
Aggressive mixing, improper pouring, moisture contamination and excessive exotherm can cause porosity in a casting.
When mixing casting resins and hardeners, avoid inducing air into the mixture by aggressive mixing action. Either stir the material with a spatula or use a mechanical mixer and drill motor. Some mixers, like those of the Jiffy Mixer line, induce less air than others. The best way to remove trapped air due to mixing is to vacuum degas (de-air) the mixture in a vacuum chamber before pouring.
Air can be trapped during the pouring process. If the casting is to be made as an open-faced pour, cast the material in a thin stream into the lowest part of the cavity. Allow the resin to flow out from that point as it pushes the air ahead of the flow. Do not pour the material back and forth causing it to fold over itself. If casting into a closed cavity, make sure the sprue (fill tube) is large enough so the resin can flow down without closing off the opening. Always have the sprue in the lowest part of the casting and provide adequate venting in the highest parts.
Moisture containing materials, like plaster and wood, should be properly sealed and released before castings are made against them. Otherwise, when the epoxy casting resin exotherms during the curing process, the heat will draw out the moisture and create surface porosity in the casting. Using sanding sealer, wax and PVC or PVA film barriers is the best way to protect the casting.
Choosing the proper hardener speed for the size of the casting and the ambient shop temperature will minimize exothermic reactions. If these reactions get hot enough, the casting resin will boil, creating porosity throughout the casting.
What is the proper way to deair a casting material?
Deairing (vacuum degassing) is used to remove mixed-in air from a casting material. Generally speaking, urethanes are easier to deair than epoxies. Epoxies have high surface tension, which makes it hard for air bubbles to break, even under vacuum. Adding a few drops of PA0550 Bubble Breaker helps to lower surface tension for easier deairing.
A leak-proof vacuum chamber and a good-quality vacuum pump are mandatory for deairing resin systems. Viewing ports in the vacuum chamber are quite helpful to determine when the degassing process is complete.
A common mistake made while vacuum degassing is to not completely remove the air from the resin. Incomplete air removal is due to inadequate equipment, vacuum leaks, or not letting the deairing process finish. Casting resin will expand from 3-5 times its normal volume while being degassed. Allow a large enough container to allow for this expansion to happen. Once the resin has expanded to its full height, the material will start to boil and soon collapse down to its original volume. At this point the vast majority of air has been removed. A few more minutes of deairing under full vacuum (if time allows) will remove most of the remaining air. If the material does not boil and fall (break) the air has only expanded and has not been removed.
Be aware that the vacuuming process generates heat in the resin mixture and will reduce the working time of the material being deaired.
What causes a casting to crack?
Cast molds crack due to built up stresses caused by excessive exotherm or improper cure cycles and thermal shock from fast heating and cooling during production cycles. Design problems such as internal sharp corners, thick-to-thin transitions and inadequate edge distances for holes or inserts can also cause cracking.
Cast tools are not as tough as laminated tools because they do not have the reinforcement that comes from cloth. Rough handling, like dropping the tool or prying them open, can cause cracking.
What causes soft castings?
If castings are soft in some areas and hard in others, it is due to improper mixing procedures. If the entire casting is soft, it is a result of either being mixed off ratio or not being fully cured. Always use the proper speed hardener for the size of the casting.
What causes excessive shrinkage?
There are two forms of shrinkage: primary shrinkage and secondary shrinkage. All thermoplastic resin systems shrink when they cure due to internally generated heat (exotherm) during the crosslinking process. This primary shrinkage can be observed after the casting has cooled and been demolded from the pattern. Selecting hardeners that are commensurate with the mass of material being cast and the ambient temperature of the shop can control primary shrinkage.
Secondary shrinkage is a result of applying external heat (oven) during post curing. This shrinkage can be observed after the final post cure. Using slow ramp-up rates, more dwell temperatures and longer time at each temperature can minimize secondary shrinkage.
What do shrinkage numbers mean on data sheets?
Published shrinkage numbers for casting resins are not meaningful unless the mold size used for testing is identified. ASTM D2566 test method uses different mold cavities for testing shrinkage. Each mold is a half round cavity, exactly 10.000 inches long. Total shrinkage is measured over the 10-inch length and reported in thousandths of inch shrinkage per inch of length. For example: In ASTM D2566 Mold #2 the shrinkage of a certain product is 0.003-inches/inch. (Over the 10 inches, the product shrinks 0.030 inches.) The same product in a #3 mold may shrink 0.010-inches/inch.
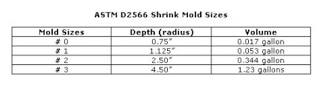
Published shrinkage numbers are only to be used for comparing one product to another that has been tested in the same size shrink mold. These numbers are not to be used in predicting actual shrinkage of a cast part or tool.
How can shrinkage be minimized for large castings?
Casting shrinkage can be minimized by choosing a hardener with the correct speed for the job, pouring less mass per cast (use multiple pours if necessary), adding bulk filler, controlling the ambient temperature during casting, and using slower post-cure cycles.
What types of bulk fillers can be used to control shrinkage?
The only constraint regarding using bulk fillers for epoxies to control shrinkage is that they should not contain moisture. If weight and machinability are not issues, dry sand, limestone, and pea gravel are cheap and effective fillers. If weight is an issue but not machinability, microballoons, volcanic rock, and walnut shells can be considered. For castings that need to be machined, use aluminum powder. If heat transfer is the main concern, use aluminum powder or particles.
How can thermal conductivity be increased?
Adding high-conductivity fillers can increase thermal conductivity of a casting resin. Aluminum shot, granules or needles are the most cost-efficient types of bulk fillers to use for increasing heat transfer. With some of our aluminum-filled (powder) casting resins, more than two times the weight of the resin/hardener can be added as aluminum filler.
To get the maximum amount of bulk aluminum filler into a casting resin, mix the resin and hardener together than add an equal amount of filler. This should make a concrete-slurry consistency. Once this blend has been cast into the mold, add dry aluminum filler to the back of the casting. If the casting is on a vibrating table, the filler will quickly sink to the bottom and more filler can be added. Keep adding filler until the casting is packed solid with aluminum.
No matter how much filler is added, conductivity of the casting resin will never be that of solid aluminum. Even a casting with the highest concentration of aluminum has each particle of aluminum coated with epoxy, which is an insulator.
Can casting resins be thinned by solvents?
Never thin epoxy and urethane casting resins by adding solvents to the mixture. Solvents that have not evaporated before the resin system gels will remain in the cast material and weaken its structure.
How can casting resins be thinned?
If a casting resin system is too thick for the application, choose a thinner resin/hardener combination or warm the system to lower its viscosity. Be aware that warming will shorten gel times and increase the level of exotherm.